Mermaid Draw Easy Draw Easy Mermaid Step Step
Heather is a language and drawing enthusiast who enjoys helping others realize their visual art skills.
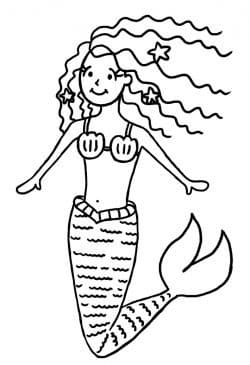
Learn how to draw a mermaid!
Learn How to Draw a Mermaid With the Help of This Step-by-Step Tutorial!
"How do you draw a mermaid?" "Will you draw a mermaid for me?" These are probably the most common questions I get from the three-to-five-year-old girls in my nursery school class! Ever since I began working at my school three years ago, I have become the resident "artistic teacher," drawing princesses, ballerinas, and mermaids for the girls, and cars, heroes, and scenes from outer space for the boys.
In this tutorial, you will learn how to draw the mermaid I draw for my girls on a daily basis. This mermaid is very simple to create—so simple that even your children should be able to copy her without much issue!

Step 1. First, draw the head.
Step 1. The Head
Whenever I start drawing a mermaid, I work from the head downwards. Start by drawing a three-quarter oval with a space left up top for the hair.
Then, start filling in the facial features. Draw two small dark oval eyes surrounded by half-moon eyelids with two long eyelashes sprouting out from them, a small pointy nose, and a smiling mouth. I like to include smile lines on the other side to give her an extra happy expression!
Finish off by drawing a half moon on the right to represent the ear.
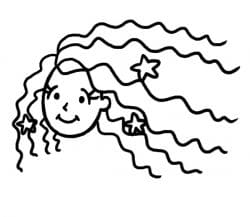
Step 2. Draw the hair.
Step 2. The Hair
The mermaid's hair is one of the easiest things to draw. All you have to do is draw a number of wavy lines emerging out of the top left-hand side of her head, at the point where the oval that represents her head ends. Try to make the hair as long and wavy as possible to give the impression that she is underwater.
You can also add decorations to her hair, such as starfish (as I have done here), flowers, or shells.
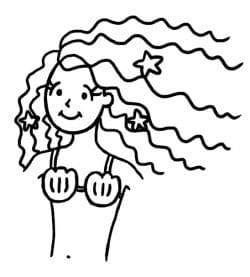
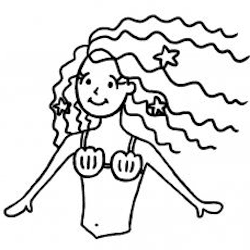
Step 3. Draw the mermaid's upper body.
Step 3. The Upper Body
This is the part where we draw the upper body, including the neck, shoulders, shell bra, and stomach. Start by drawing two lines that come down from the ear and the chin. These lines will represent the neck. Continue on with the shoulders, having them arrive just beyond her face.
On either shoulder, draw two straight lines downward to create the bra straps of her shell bra. Under each strap, draw a shell shape indented with three lines.
From the outer edge of each shell, draw a slightly diagonal line downwards to form the stomach. In the middle, draw a dot for the belly button.
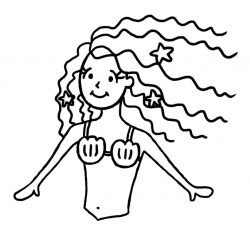
Step 4. Draw the arms.
Scroll to Continue
Read More From Feltmagnet
Step 4. The Arms
The arms can be the most difficult part of the body to draw accurately. Generally, I try to make them as long as the length between her hairline and the small strap that links the two shells on her bra together. It is also important to make sure that the wrists are thinner than the upper arms. Remember, it is more of a trial-and-error process than anything else!
If you are unconfident in drawing hands, you can do what I did and simply draw "glove hands." These hands are easier to draw for children and faster to draw for seasoned artists.
Step 5. The fun part—draw the mermaid's tail.
Step 5. The Tail
Now we reach the fun part—how to draw a mermaid tail!
Start by drawing a thick heart-shaped ring around the waist. Draw a number of lines along the ring to give the impression of scales.
Then, draw two slightly curved lines that come directly down from either side of the ring around her waist. The two lines should almost meet at a point and should be as long as the mermaid's upper body. The resulting shape should be somewhat like a carrot or an almond.
Next, draw one line that shoots up from the endpoint of the left-hand line that makes up her tail and another that shoots out from a point 1/4 of the way up the right-hand side of her tail. Have these two lines almost meet. The end of these two lines is where the fin begins.
Create the fin by drawing a wavy line up towards the right hand, and back down again. Repeat the process once again to create a second fin. The resulting image should almost resemble the claw of a crab. Try to make the lines as wavy as possible to give the impression of movement.
Finish off by drawing a number of small sideways half moons along the tail. This will make the tail look scaly, just like a fish's skin!
Now You're Finished!
At this point, your mermaid should be complete! If you are feeling creative, you can always add other adornments to your mermaid, from a pearl necklace to a crown to dangly bracelets. The sky (or ocean?) is the limit!
Welcome to my Guestbook! - Did you enjoy this tutorial? Did you learn something new?
Lyn on July 22, 2020:
Thanks so much for sharing
cami on January 08, 2020:
It was cute . Would you mind drawing ariel next ?
bella on January 01, 2020:
Interesting
magali on May 25, 2019:
that was hard work
Emily on February 21, 2019:
I love every drawing
Ademide Favourite on February 15, 2019:
Keep it up very interesting
Kaelyn on January 13, 2019:
I LOVED THAT........
Alana on December 21, 2018:
NICE TUTORIAL!!
sara pereze on December 19, 2018:
It can be a little simpler right like three steps at least?
Alexis Murray on November 01, 2018:
Yes, I thought it was wonderful put together! Easy to follow. It was fun. I enjoyed it from start to finish!
Juliatte on October 30, 2018:
So cute I love it
Chloe on October 27, 2018:
I love the drawing
Mary on June 04, 2018:
I love it
mia on May 18, 2018:
i love it
Emmakate on March 13, 2018:
I love your drawings
brooklyn on February 11, 2018:
its um... realy easy to um... do it. i love it.
Josslyn on January 17, 2018:
Is there another mermaid pictures
Briana on November 18, 2017:
I loved it.
Fay on June 22, 2017:
It has realy helped my draw thank u
Arianna on June 02, 2017:
It is so fun I love it
Amme on June 08, 2016:
Love your drawing tutorials!! So easy to follow and so cute!! Please make more!! :) :)
janey126 on September 09, 2013:
Wow what a great info and lensjust awesome!
weirdproduct on February 21, 2013:
Hey good job on this lens! I just added this lens to my featured lenses module on my "Drawing Games for Kids" Lens. Thanks!
anonymous on December 01, 2012:
helpful drawing for me.
anonymous on July 22, 2012:
Cute mermaid!
mindlessnin on June 22, 2012:
mermaids!!!I like this lens soooo much!
vBizeso on May 15, 2012:
Nice Lens
wolvyz on May 14, 2012:
Very cute tutorial. I enjoyed it.
makemoneyonline5 on May 10, 2012:
Lovely lens, kids and adults will find this really helpful. Well done :)
Lady_Kakao on May 09, 2012:
great work!
AngryBaker on May 07, 2012:
I love the faces you draw.. so sweet!
Tony Payne from Southampton, UK on May 07, 2012:
This is really cute and very easy to follow. Nicely done, blessed.
barreracarecter76.blogspot.com
Source: https://feltmagnet.com/drawing/how-to-draw-a-mermaid
0 Response to "Mermaid Draw Easy Draw Easy Mermaid Step Step"
Post a Comment